
Learn to Code, Compile, and Deploy in the Remix IDE
 By Dibas Dauliya
Share
By Dibas Dauliya
Share

In this article, we’ll create a contract, compile it, and deploy it in Remix, which is an online-based IDE (Integrated Development Environment). That means everything will work within the browser, and we do not need to go through the setup hassle.
Talking about the smart contract, we will create an array of strings and store them in the variable. Then we’ll create a function that accepts the string and pushes it into the array that we stored in the variable. Also, we will create another function that counts the total number of strings in the array.
To begin, open the Remix IDE in the browser using this link. Right off the bat, it gives you a workspace with contracts, scripts, and tests folders along with a README file. We’ll be working in the contracts folder.
Smart contract coding
Create a file named MyArray.sol under the contracts folder.
Firstly, specify the version of Solidity.
pragma solidity >=0.7.0 <0.9.0;After that, create a contract named MyArray and store the array of strings in strArray variable. This variable also acts like public read-only function which means we can call it and read its value from the frontend.
contract MyArray {
    string[] public strArray = ["one", "two", "three"];
}
In this project, we are only dealing with an array of strings. If you want to work with an array of integers, you’ll need to specify unit[] instead of string[].
Now, inside the same contract, let’s create a function to push the given string into the public variable strArray.
function addValue(string memory _value) public {
    strArray.push(_value);
}
Finally, let’s create a variable to count the total number of strings inside the array.
function valueCount() public view returns(uint) {
    return strArray.length;
}
Full code, in case you feel you messed up.
pragma solidity >=0.7.0 <0.9.0;

contract MyArray {
    string[] public strArray = ["one", "two", "three"];

    function addValue(string memory _value) public {
        strArray.push(_value);
    }

    function valueCount() public view returns(uint) {
        return strArray.length;
    }
}
So, this is it for the coding part. Now let’s get this compiled and then deploy it.
Compiling and deploying smart contract
In the vertical tab on the left hand side, you have three options, and the second one is the Solidity compiler, as shown in the picture below.
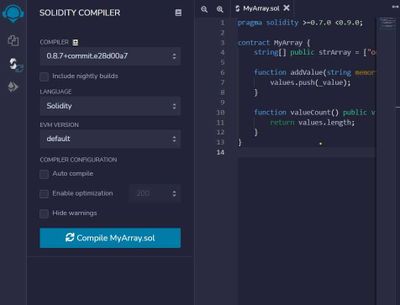
Click the solidity compiler option with the MyArray.sol file open. After that, click the "Compile MyArray.sol" button.
Once the contract is compiled, click the "Deploy and run transactions" button, which is in the same vertical tab on the left hand side. Then click on the "Deploy" button.
Right after you click the button, you will see the Ethereum of the test account drop by a small amount because of the gas price, and you will also see the transaction details in the console, which is at the bottom of the page on the right hand side.
Deploy using Metamask
If you deploy using Remix's built-in test account, then we can face problems while playing with the functions of the smart contract from the frontend. So to deploy from the wallet, choose "Injected Web3" from the dropdown menu of "Environment" and connect with the test network of the wallet.

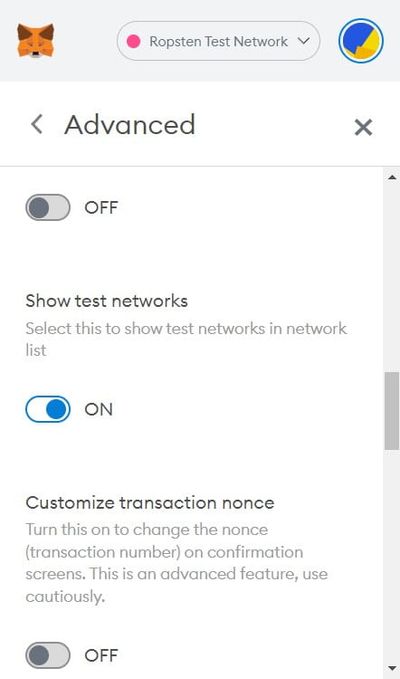
If you have no test network, go to the settings of the wallet, and then click "Advanced." After that, scroll down until you see "Show test networks", then turn it on. Then switch your network from "Ethereum Mainnet" to "Ropsten Test Network".
Now, go to the Ropsten testnet faucet website to load some test ethers into the wallet. Copy the address from the wallet and click the button. It might take a while to show, but after some minutes you'll see some test ethers in your wallet.
After that, click on the deploy button, and we can easily interact with our contract using the Metamask from the front end.
Play with functions
To call the functions we created on the smart contract, click on the "> MYARRAY AT 0X...", which is below the "Deploy" button and under the "Deployed Contracts" section.
The yellow button triggers the write-only function, which costs Ethereum as a gas price, and the blue button triggers the read-only function, which does not cost Ethereum.
While trying to play with these functions, you might feel strange when dealing with strArray function. It doesn’t reply to the whole list of arrays, and it requires you to enter the position of the required string in the array.
If you want to get the whole array instead of getting a specific string, we can implement the following function.
function getArray() public view returns (string[] memory) {
    return strArray;
}
Now, compile it, deploy it, and try to call the functions.
Trade Off
Remix is a beginner-friendly IDE to develop, deploy, and test smart contracts, and probably all the Web3 developers started their journey to coding smart contracts using it. It is definitely not recommended to use in large projects because it is difficult to keep a backup of the project and go back to the previous versions of code using git.
It is recommended to use tools like Hardhat or Truffle for large projects. If you're having trouble deciding between these two tools, check out the Truffle vs. Hardhat article.
Conclusion
So, this is it for this article. Please follow the next article if you want to call the functions of this contract from the website using Ethers.js instead of the Remix IDE.