
Connecting Remix with Ethers.js
 By Dibas Dauliya
Share
By Dibas Dauliya
Share

In the previous article, we wrote the contract and then compiled and developed it using the Remix IDE. This article is all about connecting the smart contract written in the Remix IDE with the frontend. We’ll be using the Ethers.js library with pure HTML and CSS to interact with the functions of the contract.
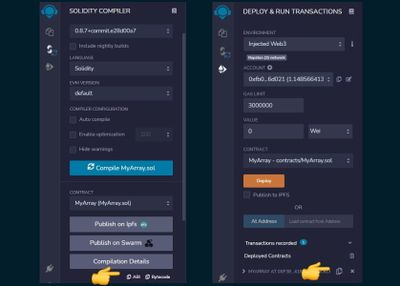
We need the ABI code from the smart contract, which can be found in the compiler tab of the IDE. ABI stands for Application Binary Interface, and it contains the functions that we wrote in smart contracts.
In addition, we require the test account in the wallet using which we deployed the contract. We also need the contract address, which we can find in the deploy transaction tab of the Remix, and I will also elaborate more on it below.
Now let’s build a dApp.
Remix IDE with HTML website
Create a folder, open it in your favorite code editor, and then create a file named index.html within it.
In the code below, I have created a table to play with the functions of the smart contract and added the script tag to fetch the Ethers.js library.
<!DOCTYPE html>
<html lang="en">
  <head>
    <meta charset="UTF-8" />
    <meta http-equiv="X-UA-Compatible" content="IE=edge" />
    <meta name="viewport" content="width=device-width, initial-scale=1.0" />
    <title>Remix with HTML</title>

    <style>
      body {
        font-family: 'Segoe UI', Tahoma, Geneva, Verdana, sans-serif;
        margin: 20px auto;
        width: fit-content;
      }
      th,
      td {
        border: solid;
        padding: 20px;
      }

      table {
        border-collapse: collapse;
      }
    </style>

  </head>
  <body>
    <h1>Remix IDE with HTML website</h1>

    <table>
      <thead>
        <tr>
          <th>Function</th>
          <th>Input</th>
          <th>Result</th>
          <th>Remarks</th>
        </tr>
      </thead>
      <tbody>
        <tr>
          <td><code>addValue</code>: adds value to the array</td>
          <td>
            <form id="addValueSubmit">
              <input type="text" placeholder="four" id="addValueInput" />
              <button>Add it</button>
            </form>
          </td>
          <td>N/A</td>
          <td>Write function</td>
        </tr>
        <tr>
          <td><code>strArray</code>: get the string from array</td>
          <td>
            <input type="number" placeholder="0" />
          </td>
          <td><button>Get String</button>: <span id="getString">one</span></td>
          <td>Read function</td>
        </tr>
        <tr>
          <td><code>valueCount</code>: counts total length of an array</td>
          <td>N/A</td>
          <td>
            <button onclick="getValueCount()">Get Count</button>:
            <span id="getCount">n/a</span>
          </td>
          <td>Read function</td>
        </tr>
      </tbody>
    </table>

    <!-- https://github.com/ethers-io/ethers.js/#installing -->
    <script
      src="https://cdn.ethers.io/lib/ethers-5.6.umd.min.js"
      type="text/javascript"
    ></script>

    <script type="text/javascript">
      // start
    </script>
  </body>
</html>
Writing to the contract from frontend
To write or read data to/from smart contract we need contract address, ABI code, which was given by Remix IDE while deploying the contract in previous post, and it can be found on the Deploy and the Compile tab. I have included the pictures of the tabs below.
So after adding the constants, I am accessing the provider and signer from the window.ethereum which is injected in the browser by Metamask wallet extension. Provider and signer is required to tell the wallet to deal with gas fees and proceed the blockchain process.
Side note: We do not need to pay gas fees while just reading from the contract, but we need to pay it if we want to write to the blockchain.
After that, I'm accessing the contract with the help of Ethers.js by providing the contract address, ABI code, and signer.
Then I'm calling the function of smart contract and passing the value to it from the input field. After that, Metamask wallet will pop-open and it will run the blockchain process after paying the gas fees. After some time, the transaction will succeed 🤞, and the results containing transaction hash and all the goodies will be logged in the console.
<script type="text/javascript">
      const addValueSubmit = document.getElementById('addValueSubmit'),
        addValueInput = document.getElementById('addValueInput'),
        contractAddress = '0xf386e5A9B432F8D37C9D249651ca38c29Ef418dD',
        abi = [
          {
            inputs: [
              {
                internalType: 'string',
                name: '_value',
                type: 'string'
              }
            ],
            name: 'addValue',
            outputs: [],
            stateMutability: 'nonpayable',
            type: 'function'
          },
          {
            inputs: [
              {
                internalType: 'uint256',
                name: '',
                type: 'uint256'
              }
            ],
            name: 'strArray',
            outputs: [
              {
                internalType: 'string',
                name: '',
                type: 'string'
              }
            ],
            stateMutability: 'view',
            type: 'function'
          },
          {
            inputs: [],
            name: 'valueCount',
            outputs: [
              {
                internalType: 'uint256',
                name: '',
                type: 'uint256'
              }
            ],
            stateMutability: 'view',
            type: 'function'
          }
        ]

      let addValueInputResult

      async function addValueToContract() {
        const provider = new ethers.providers.Web3Provider(window.ethereum)
        await provider.send('eth_requestAccounts', [])
        const signer = await provider.getSigner()

        const contract = new ethers.Contract(contractAddress, abi, signer)

        const res = await contract.addValue(addValueInputResult)
        res.wait()
        console.log(res)
      }

      addValueInput.addEventListener('keyup', (e) => {
        addValueInputResult = e.target.value
      })

      addValueSubmit.addEventListener('submit', (e) => {
        if (!addValueInputResult) {
          alert("Input can't be empty")
          return
        }
        addValueToContract()
        e.preventDefault()
      })
    </script>
Reading the contract
Firstly, let’s get the string from the array. For this, we should enter the position of the string in the array and it will give us the string. Like above, I have stored the context of the input, button, and span to fetch and show the data from the contract.
    const addValueSubmit = document.getElementById('addValueSubmit'),
      addValueInput = document.getElementById('addValueInput'),
      getStrInput = document.getElementById('getStrInput'),
      getStrBtn = document.getElementById('getStrBtn'),
      getStrValue = document.getElementById('getStrValue'),
      contractAddress = '0xf386e5A9B432F8D37C9D249651ca38c29Ef418dD',
      abi = [...]

      let getStrInputResult

      //   for strArray
      async function getStrArrayFromContract() {
        getStrValue.innerText = 'Loading...'

        try {
          const provider = new ethers.providers.Web3Provider(window.ethereum)
          await provider.send('eth_requestAccounts', [])
          const contract = new ethers.Contract(contractAddress, abi, provider)

          const res = await contract.strArray(getStrInputResult)
          getStrValue.innerText = res.toString()
        } catch (error) {
          getStrValue.innerText = 'error occurred'
          console.error(error)
        }
      }

      getStrInput.addEventListener('keyup', (e) => {
        getStrInputResult = e.target.value
        e.preventDefault()
      })

      getStrBtn.addEventListener('click', () => {
        if (!getStrInputResult) {
          alert("Input can't be empty")
          return
        }
        getStrArrayFromContract()
      })
Finally, let’s create a function to count the total number of strings in the array. For this, I have added the getValueCount function to the onclick of the button. So the function will be automatically called when we click the button and display the total count in the result column.
    ...
     async function getValueCount() {
      const getCount = document.getElementById('getCount');
        getCount.innerText = 'Loading...'

        try {
          const provider = new ethers.providers.Web3Provider(window.ethereum)
          await provider.send('eth_requestAccounts', [])
          const contract = new ethers.Contract(contractAddress, abi, provider)

          const res = await contract.valueCount()
          getCount.innerText = res.toString()
        } catch (error) {
          getCount.innerText = 'n/a'
          console.error(error)
        }
      }
    ...
So that is all for now. We successfully created a read and write function using the Remix IDE and Ethers.js.