Truffle vs Hardhat | Which is the best tool to develop smart contract?
 By Dibas Dauliya
Share


Remix, the Ethereum IDE, is great for beginners working on smaller projects, but once we start adding more logic to our smart contracts, we'll need a tool to efficiently test and deploy them in the local development chain, testnet, or mainnet.
Also, in Remix, we need to copy the ABI code of the smart contracts, which helps us interact with the functions of smart contracts, manually, but using tools like Hardhat and Truffle Suite, we can automate this process.
Among these functionalities, some can be faster or slower in these tools, and both Hardhat and Truffle Suite have their own pros and cons. We'll discuss both the similarities and differences between these tools.
LET'S GO!
Similarities and Differences
Truffle is the oldest tool, which was developed in 2016 by ConsenSys Software Inc., which also developed the most popular crypto wallet, MetaMask. Hardhat is a new tool released in 2019 by the Nomic Foundation and is supported by the Ethereum Foundation. Both are open source and actively maintained. They both have a massive community.
When it comes to running tests or deploying the contracts, Hardhat is flexible because we can write our own script. It also has several plugins which extend Hardhat’s functionality. For instance, @nomiclabs/hardhat-etherscan automates the process of verifying the contracts on Etherscan, where we can explore and analyze Ethereum contracts. Moreover, we can use @nomiclabs/hardhat-truffle5 to integrate Hardhat with Truffle Contract. BUT, Truffle has a fixed way of doing things, which makes it less flexible than Hardhat.
Hardhat has error handling and testing tools like console.log method, which we can call from the smart contracts and log in the terminal, but in Truffle, we should write our own events and deal with them to test our contracts. Hardhat also gives stack traces, so we can inspect what happened in our contract if we change it. This can be super useful while debugging our smart contract, but in Truffle we just get the error message instead of actual stack traces.
Hardhat makes it easier to fork the blockchain using Alchemy using the single line of code npx hardhat node --fork https://eth-mainnet.alchemyapi.io/v2/ without any installation, whereas this process is lengthier in Truffle and requires installing Ganache.
Truffle uses the Web3.js library to interact with smart contracts, whereas Ethers.js is the default library for Hardhat. As for the trend, most developers are using Ethers.js over Web3.js because they believe it is a bit more user-friendly and easier to use, but of course, they both have their own pros and cons, which we have discussed in another article. We can also use Web3.js in Hardhat by using its plugin named @nomicslabs/hardhat-web3. Also, we can install Ethers.js as a dependency to use it in Truffle tests.
We can easily integrate TypeScript into Hardhat using its official guide, whereas it requires a lot of work to integrate TypeScript into Truffle.
Trends
As seen on the Internet, popular Web3 YouTubers like Nader Dabit, Dapp University, and Patrick Collins are using Hardhat in their latest crash course and recommend it.
To sum up, both are updated regularly and backed up by a renowned and trusty company. I’d recommend trying both and sticking with whichever one you feel is easier to work with.
Small Project
Enough theories, let’s build a simple app that displays an editable "hello world" using both the Hardhat and the Truffle Suit.
Using Hardhat
Create a folder and open it in the editor of your choice.
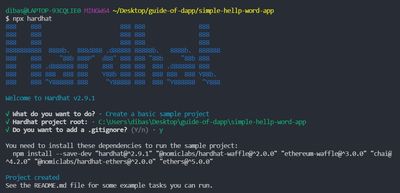
Open the terminal and run npx hardhat. After that, choose "Create a basic sample project" and then it will create a project as shown in the image below after giving simple details.

Now, as suggested by Hardhat in the terminal, install the required dependencies:
npm install --save-dev "hardhat@^2.9.1" "@nomiclabs/hardhat-waffle@^2.0.0" "ethereum-waffle@^3.0.0" "chai@^4.2.0" "@nomiclabs/hardhat-ethers@^2.0.0" "ethers@^5.0.0"After that, open the Greeter.sol file, which is inside the contracts folder, and add the following code. In this code, we are creating the greeting variable, which is public and has the string value "Hello World," and the setGreeting function, which can change the value of the greeting variable.
//SPDX-License-Identifier: Unlicense
  pragma solidity ^0.8.0;

  import "hardhat/console.sol";

  contract Greeter {
      string public greeting = 'Hello World';

      function setGreeting(string memory _greeting) public {
          console.log("Changing greeting from '%s' to '%s'", greeting, _greeting);
          greeting = _greeting;
      }
  }
Now, we can write scripts under scripts/smaple-script.js file. We need to change some values in that file because we changed Greeter.sol. Make sure to change const greeter = await Greeter.deploy("Hello, Hardhat!"); into const greeter = await Greeter.deploy(); because we no longer have constructor in our smart contract.
Now let’s run the local development server to get test accounts:
npx hardhat nodeFinally, run the command given below to deploy the contract, and we are done:
npx hardhat run scripts/sample-script.js --network localhostThis will compile the solidity files and deploy the contract locally. If you get some errors, then make sure you have edited the Greeter.sol and sample-script.js file as instructed above and saved all your files.
Using Truffle
Open the terminal and run npm install -g truffle or yarn global add truffle to install Truffle globally. Try installing the lower version as npm install -g [email protected] if you get an error.
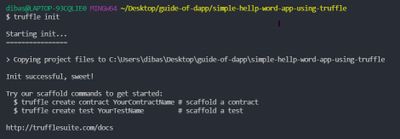
Create a folder and open it in the editor of your choice. After that, run truffle init or npx truffle init inside that folder, and it will create the project.

Then, open the Migration.sol file which is inside the contracts folder and add the following code, which is the same as that of the above Hardhat project.
  //SPDX-License-Identifier: Unlicense
  pragma solidity ^0.8.0;

  contract Migrations {
      string public greeting = 'Hello World';

      function setGreeting(string memory _greeting) public {
          greeting = _greeting;
      }
  }
Now, since the default code in Migrations.sol didn’t have a constructor function, we don’t need to modify migrations/1_initial_migration.js.
Now run truffle develop command and it will run the local development server and give test accounts.
It will give the writing interface inside the above command. Now, enter migrate --reset and run it to deploy our smart contract. If you get some errors, then make sure you have edited the Migrations.sol file as instructed above and saved it.
So we created a contract and deployed it using both tools. Now we will use it and connect it with the frontend using Ethers.js and Web.js libraries in the next article about Ethers.js vs Web.js.