
Connect Hardhat Contract with Ethers in Frontend
 By Dibas Dauliya
Share
By Dibas Dauliya
Share

Hardhat is the easy and user-friendly tool to code, compile, test, and deploy smart contract. Ethers.js is the JavaScript library to interact with smart contracts. We will use Ethers.js to send and receive the data from smart contract that we created using Hardhat in previous article.
Prerequisite
- You need to read our previous article about writing smart contract in Hardhat, where you learn to compile and deploy the contract. While deploying the contract, it should compile the solidity code and create the
ABIcode inShowName.jsonfile undercontractsdirectory. You’ll need thatjsonfile. You can also access the code via GitHub repo, and follow the instruction of ReadMe to compile and deploy the contract. - After deploying the contract, you must have gotten the contract address in the terminal. Note the contract address somewhere.
- You should keep running the local server which you ran using
npx hardhat nodecommand before deploying the contract as instructed in previous article. Do not disconnect the server.
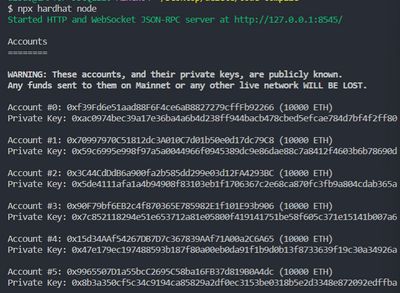
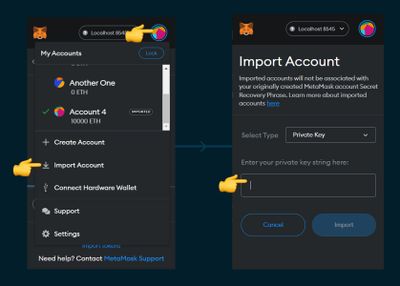
- Copy the private key of the first wallet address given after running the local server and import it in the MetaMask wallet.
Project
We will have the three sections in our website. At the top section, we will create a “connect to the wallet” functionality and we’ll fetch the address from the wallet.
In the second section, we’ll create the input field and send the data to the blockchain using Ethers.js. And, finally in third section, we will request the data from the blockchain and display it.
We’ll be using simple HTML and JavaScript to achieve this. I have chosen to use Parcel bundler because of the import syntax and it has hot module refreshing feature.
To set-up parcel, you can create package.json in the working directory, and paste the following code in it which themselves are self-explanatory.
{
  "name": "hardhat-ethers",
  "version": "1.0.0",
  "description": "",
  "main": "index.js",
  "scripts": {
    "dev": "parcel src/index.html"
  },
  "keywords": [],
  "author": "",
  "license": "ISC",
  "devDependencies": {
    "parcel": "^2.7.0",
    "process": "^0.11.10"
  },
  "dependencies": {
    "ethers": "^5.6.9"
  }
}
After this, run npm install command in the terminal to install dependencies listed above.
Now you need to create a src directory, and index.html file inside it, where we will be writing code throughout this project. You need to copy the ABI as said above in prerequisite section, and paste it in a new file under same src directory by naming it as web3.json.
So below is the total HTML for this project. I’ve wrapped the three section that we talked about in the fieldset under form tag.
<form>
  <fieldset>
    <legend>Wallet Details</legend>
    <ul>
      <li>Address: <span id="address-value"></span></li>
      <li>
        isConnected:
        <span id="is-connected-value">click to the button</span>
      </li>
    </ul>
    <button type="button" id="connect-button">Connect</button>
  </fieldset>

  <fieldset>
    <legend><code>set</code> function</legend>
    <input type="text" placeholder="Enter a thing to set" id="set-value" />
    <button type="button" id="set-button">Set it!</button>
  </fieldset>

  <fieldset>
    <legend><code>get</code> function</legend>
    <p id="get-value">click the button to display</p>
    <button type="button" id="get-button">Click & Get it!</button>
  </fieldset>
</form>
Now comes the fun part, JavaScript. Let’s store all the required DOM elements in variables and import ABI and ethers for further integrations.
<script type="module">
  import { abi } from './web3.json';
  import { ethers } from 'ethers';

  const setValue = document.getElementById('set-value'),
    setButton = document.getElementById('set-button'),
    getValue = document.getElementById('get-value'),
    getButton = document.getElementById('get-button'),
    connectButton = document.getElementById('connect-button'),
    addressValue = document.getElementById('address-value'),
    isConnectedValue = document.getElementById('is-connected-value');
<script/>
Noticed type="module" attribute? It is required for parcel to enable its hot module refreshing feature.
Let’s add more variables for interaction with wallet and smart contract.
let isConnected;

const provider = new ethers.providers.Web3Provider(window.ethereum),
 signer = provider.getSigner(),
 contractAddress = '0x9fE46736679d2D9a65F0992F2272dE9f3c7fa6e0',
 providerContract = new ethers.Contract(contractAddress, abi, provider),
 signerContract = new ethers.Contract(contractAddress, abi, signer);
Provider and signer are given by the MetaMask wallet extension. providerContract is required to call the functions of smart contract just to read the data, and signerContract is required to send data to the blockchain by paying gas fee.
Now, let’s connect our website to the wallet and get signer, provider, and wallet address.
connectButton.addEventListener('click', async () => {
  try {
    isConnectedValue.innerText = 'Loading...'
    await provider.send('eth_requestAccounts', [])

    const address = await signer.getAddress()
    addressValue.innerText = address
    isConnectedValue.innerText = 'Connected'
    isConnected = true
  } catch (error) {
    console.log(error)
    isConnectedValue.innerText = `Error occurred. ${error}`
    isConnected = false
  }
})
Next, let’s tap in to the click event of the button that sends our entered value to the blockchain.
setButton.addEventListener('click', async () => {
  checkWallet()

  const { value } = setValue
  if (isConnected) {
    try {
      const transaction = await signerContract.set(value)
      await transaction.wait()
      console.log({ transaction })
    } catch (error) {
      console.log(error)
    }
  }
})

function checkWallet() {
      if (!isConnected) {
        alert('Connect to the wallet')
        return
      }
}
If any error occurred, then the problem might be one of the following:
- You are not running the local blockchain server as instructed in prerequisite section.
- You haven’t changed the network of your wallet to the
localhosthaving chain ID as31337and new RPC URL as http://localhost:8545. - You disconnected the local blockchain server after deploying the contract, and again connected it. Run the local server using
npx hardhat node, deploy the contract, and do not interrupt it.
Also look carefully at the logged details at the terminal where you ran the local blockchain server.
Finally, for our third part, let’s fetch the data from blockchain and display in the web page. We will call our function MyName from providerContract because we do not need to pay gas fee for just reading data from blockchain.
getButton.addEventListener('click', async () => {
  checkWallet()

  try {
    const fetchedValue = await providerContract.MyName()
    console.log(fetchedValue)
    getValue.innerText = fetchedValue.toString()
  } catch (error) {
    console.log(error)
  }
})
Full javascript code
<script type="module">
  import { abi } from './web3.json'
  import { ethers } from 'ethers'

  const setValue = document.getElementById('set-value'),
    setButton = document.getElementById('set-button'),
    getValue = document.getElementById('get-value'),
    getButton = document.getElementById('get-button'),
    connectButton = document.getElementById('connect-button'),
    addressValue = document.getElementById('address-value'),
    isConnectedValue = document.getElementById('is-connected-value')

  let isConnected

  const provider = new ethers.providers.Web3Provider(window.ethereum),
    signer = provider.getSigner(),
    contractAddress = '0x9fE46736679d2D9a65F0992F2272dE9f3c7fa6e0',
    providerContract = new ethers.Contract(contractAddress, abi, provider),
    signerContract = new ethers.Contract(contractAddress, abi, signer)

  function checkWallet() {
    if (!isConnected) {
      alert('Connect to the wallet')
      return
    }
  }

  setButton.addEventListener('click', async () => {
    checkWallet()

    const { value } = setValue
    if (isConnected) {
      try {
        const transaction = await signerContract.set(value)
        await transaction.wait()
        console.log({ transaction })
      } catch (error) {
        console.log(error)
      }
    }
  })

  getButton.addEventListener('click', async () => {
    checkWallet()

    try {
      const fetchedValue = await providerContract.MyName()
      console.log(fetchedValue)
      getValue.innerText = fetchedValue.toString()
    } catch (error) {
      console.log(error)
    }
  })

  connectButton.addEventListener('click', async () => {
    try {
      isConnectedValue.innerText = 'Loading...'
      await provider.send('eth_requestAccounts', [])

      const address = await signer.getAddress()
      addressValue.innerText = address
      isConnectedValue.innerText = 'Connected'
      isConnected = true
    } catch (error) {
      console.log(error)
      isConnectedValue.innerText = `Error occurred. ${error}`
      isConnected = false
    }
  })
</script>
You can also view the complete code at our GitHub repository.
So this is our short and sweet project to teach you about interacting smart contract (made using Hardhat) from frontend (using Ethers.js).